

前言
新书Java并发编程系统与模型已上线,欢迎拜读。
由于微信小程序要使用Https,但是又不能修改已有线上的配置。所以最简单的方法就是使用nginx转发,在nginx上使用https,然后再转发到内部服务器。Nginx由于其优良的性能。一台4核16GB的内存完全可以支撑日均百万pv级别的访问。
基础知识
Nginx由于使用了 epoll模型,要求linux的内核必须在2.6以上。要了解epoll模型,可以看看知乎上的这篇文章IO多路复用与 select,poll与epoll的关系。
使用 uname -a 查看Linux 内核版本,如下是Centos 6.5的显示:
Linux VM_26_145_centos 2.6.32-504.30.3.el6.x86_64 #1 SMP Wed Jul 15 10:13:09 UTC 2015 x86_64 x86_64 x86_64 GNU/Linux下载
Nginx 的官网的下载地址:nginx.org/en/download…
Nginx官网提供了三个类型的版本:
- Mainline version:Mainline 是 Nginx 目前主力在做的版本,可以说是开发版
- Stable version:最新稳定版,生产环境上建议使用的版本
- Legacy versions:遗留的老版本的稳定版
编译与安装
nginx依赖以下模块:
- gzip模块需要 zlib 库 及其开发环境
- rewrite模块需要 pcre 库及开发环境
- ssl 功能需要openssl库及开发环境以及 yum install -y gcc-c++ 环境。
以gzip 模块为例,查看以下模块是否安装:
rpm -qa |grep zlib 如果没有安装,那么就 yum install zlib zlib-devel。
make是用来编译的,它从Makefile中读取指令,然后编译。make install是用来安装的,它也从Makefile中读取指令,安装到指定的位置。
最简单的编译安装 Nginx
tar zxvf nginx-1.10.2.tar.gz
解压以后进入到
  [root@VM_26_145_centos nginx-1.10.2]# ./configure
  [root@VM_26_145_centos nginx-1.10.2]# make
  [root@VM_26_145_centos nginx-1.10.2]# make install
./configure 是用来检查本机的的安装环境。在configure阶段结束以后,将会出现如下信息:
Configuration summary
  + using system PCRE library
  + OpenSSL library is not used
  + md5: using system crypto library
  + sha1: using system crypto library
  + using system zlib library

  nginx path prefix: "/usr/local/nginx"
  nginx binary file: "/usr/local/nginx/sbin/nginx"
  nginx configuration prefix: "/usr/local/nginx/conf"
  nginx configuration file: "/usr/local/nginx/conf/nginx.conf"
  nginx pid file: "/usr/local/nginx/logs/nginx.pid"
  nginx error log file: "/usr/local/nginx/logs/error.log"
  nginx http access log file: "/usr/local/nginx/logs/access.log"
  nginx http client request body temporary files: "client_body_temp"
  nginx http proxy temporary files: "proxy_temp"
  nginx http fastcgi temporary files: "fastcgi_temp"
  nginx http uwsgi temporary files: "uwsgi_temp"
  nginx http scgi temporary files: "scgi_temp"
可以看到默认的安装目录以及一些基本的配置。
启动
nginx默认采用80端口,在直接启动nginx之前,先检查80端口是否被占用,使用fuser -n tcp 80或者netstat -pan | grep :80查看80端口是否被占用。这里假设没有被占用,然后进入 /usr/local/nginx(上文提到的默认安装目录)目录:
[root@VM_26_145_centos nginx]# sbin/nginx -c conf/nginx.conf访问:http://ip:80/就可以看到nginx的欢迎页面。
nginx配置
在/usr/local/nginx/conf(默认配置)中,有一个nginx.conf文件。nginx.conf的代码是这样的:
# user  nobody;
worker_processes  1;

#error_log  logs/error.log;
#error_log  logs/error.log  notice;
#error_log  logs/error.log  info;

#pid        logs/nginx.pid;

events {
    worker_connections  1024;
}

http {
    include       mime.types;
    default_type  application/octet-stream;

    #log_format  main  '$remote_addr - $remote_user [$time_local] "$request" '
    #                  '$status $body_bytes_sent "$http_referer" '
    #                  '"$http_user_agent" "$http_x_forwarded_for"';
    #access_log  logs/access.log  main;
    sendfile        on;
    #tcp_nopush     on;
    #keepalive_timeout  0;
    keepalive_timeout  65;
    #gzip  on;
    server {
        listen       80;
        server_name  localhost;
        #charset koi8-r;
        #access_log  logs/host.access.log  main;
        location / {
            root   html;
            index  index.html index.htm;
        }
        #error_page  404              /404.html;
        # redirect server error pages to the static page /50x.html
        #
        error_page   500 502 503 504  /50x.html;
        location = /50x.html {
            root   html;
        }
        # proxy the PHP scripts to Apache listening on 127.0.0.1:80
        #
        #location ~ \.php$ {
        #    proxy_pass   http://127.0.0.1;
        #}
        # pass the PHP scripts to FastCGI server listening on 127.0.0.1:9000
        #
        #location ~ \.php$ {
        #    root           html;
        #    fastcgi_pass   127.0.0.1:9000;
        #    fastcgi_index  index.php;
        #    fastcgi_param  SCRIPT_FILENAME  /scripts$fastcgi_script_name;
        #    include        fastcgi_params;
        #}

        # deny access to .htaccess files, if Apache's document root
        # concurs with nginx's one
        #
        #location ~ /\.ht {
        #    deny  all;
        #}
    }
    # another virtual host using mix of IP-, name-, and port-based configuration
    #
    #server {
    #    listen       8000;
    #    listen       somename:8080;
    #    server_name  somename  alias  another.alias;

    #    location / {
    #        root   html;
    #        index  index.html index.htm;
    #    }
    #}

    # HTTPS server
    #
    #server {
    #    listen       443 ssl;
    #    server_name  localhost;

    #    ssl_certificate      cert.pem;
    #    ssl_certificate_key  cert.key;

    #    ssl_session_cache    shared:SSL:1m;
    #    ssl_session_timeout  5m;

    #    ssl_ciphers  HIGH:!aNULL:!MD5;
    #    ssl_prefer_server_ciphers  on;

    #    location / {
    #        root   html;
    #        index  index.html index.htm;
    #    }
    #}

}
删掉不必要的文件,基本文件类型是这个样子:
# user  nobody;
worker_processes  1;
#error_log  logs/error.log;
#error_log  logs/error.log  notice;
#error_log  logs/error.log  info;
#pid        logs/nginx.pid;
events {
    worker_connections  1024;
}

http {
    include       mime.types;
    default_type  application/octet-stream;
    #log_format  main  '$remote_addr - $remote_user [$time_local] "$request" '
    #                  '$status $body_bytes_sent "$http_referer" '
    #                  '"$http_user_agent" "$http_x_forwarded_for"';
    #access_log  logs/access.log  main;
    sendfile        on;
    #tcp_nopush     on;
    #keepalive_timeout  0;
    keepalive_timeout  65;
    #gzip  on;

    server {
        listen       80;
        server_name  localhost;
        #charset koi8-r;
        #access_log  logs/host.access.log  main;
        location / {
            root   html;
            index  index.html index.htm;
        }
    }

}
注意到最顶上的日志配置吗?在顶部设置的配置全局生效。但是子模块可以覆盖它。顶部日志配置:
    error_log  /disk/nginx/logs/error.log;
    accsess_log  去掉 mian  。 main 表示的用户自定义的日志格式的名字。 目前并没有设置。
假设开发人员改变了nginx.conf配置,测试nginx.conf是否合法:
[root@VM_220_53_centos nginx]# sbin/nginx  -t  -c conf/nginx.conf
nginx: the configuration file /usr/local/nginx/conf/nginx.conf syntax is ok
nginx: configuration file /usr/local/nginx/conf/nginx.conf test is successful
nginx配置文件架构的图:
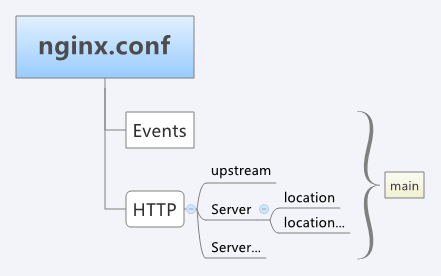
这里有详细的配置。
###https
在编译阶段需要附带编译上ssl模块:./configure --with-http_ssl_module
限流
limit_req_zone $binary_remote_addr zone=perip:10m rate=1r/s;
limit_req_zone $server_name zone=perserver:10m rate=10r/s;

server {
    ...
    limit_req zone=perip burst=5 nodelay;
    limit_req zone=perserver burst=10;
}
注意在Http中配置以后需要在server中引入。
burst一秒中可以访问的数据量。burst相当于一个授权令牌,每秒中每次查询,当前burst-1,查询结束,burst+1;
如果burst为0时,访问不了。
public class TestNginx {
    @Test
    public void testMobileIsUsed() {
        for (int i = 0; i < 100; i++) {
            HttpResponse response = HttpRequest.get("http://123.206.18.37:8088/").send();
            if (response.statusCode() != 200) {
                assertEquals(1, 0);
            }
            System.out.println(response.bodyText());

        }
    }
}
可以看到,基本上是1秒返回一次了。
实例配置:
#user  nobody;
worker_processes  1;
error_log  /disk/nginx/logs/error.log;
#error_log  logs/error.log  notice;
#error_log  logs/error.log  info;
pid        logs/nginx.pid;

events {
    worker_connections  2048;
}

http {
    include       mime.types;
    default_type  application/octet-stream;
    access_log  /disk/nginx/logs/host.access.log;
    sendfile        on;
    #tcp_nopush     on;
    #keepalive_timeout  0;
    keepalive_timeout  65;

    #gzip  on;
      limit_req_zone $binary_remote_addr zone=perip:10m rate=1r/s;
       limit_req_zone $server_name zone=perserver:10m rate=10r/s;
    # HTTPS server
    server {
        limit_req zone=perip burst=5 nodelay;//限流配置
        limit_req zone=perserver burst=10;
        listen 443;
        server_name mp.baidu.com;
        ssl on;
        ssl_certificate  1_mp.baidu.com_bundle.crt;
        ssl_certificate_key  2_mp.baidu.com.key;
        ssl_session_timeout 5m;
        ssl_protocols TLSv1 TLSv1.1 TLSv1.2;
        ssl_ciphers ECDHE-RSA-AES128-GCM-SHA256:HIGH:!aNULL:!MD5:!RC4:!DHE;
        ssl_prefer_server_ciphers on;
        location / {
            root   html;
            index  index.html index.htm;
            proxy_pass http://10.105.26.210;  //直接转发
        }
    }

}